How to modify the wp-config.php file to change the autosave interval time in WordPress.
Change the Autosave Interval in WordPress : It’s quite easy to do. You just need to modify the wp-config.php file. But what I couldn’t find on the web was where this wp-config.php file was and how to access it using FTP.
Note : If you are already familiar with FTP usage and don’t need to read all my below blah blah on how to use FTP. Here is the map to the file
/lamp0/web/vhosts/www.yoursitename.com/htdocs
Everyone tells you how to modify it, but nowhere could I find where it was exactly, as its hidden away under many folders and how to access it using FTP. Hence this post
When I’m writing in my WordPress Blog I’m often stuck for a while while the Autosave saves the page. Now while this is useful in itself, its a right pain as it does it every 60 seconds.
So I did a quick Google research on how to change this. In itself its not difficult you have two options. Either download a plugin to modify the timing or change the wp-config.php file yourself.
I didn’t really want to download a plugin just to do this. The less plugins I have the better. I thought that I’d modify my wp-config.php file myself as that shouldn’t be to difficult. Like most setup files on a computer its just a text file.
Change the Autosave Interval in WordPress : So I found out by googling around, what to change or rather what to add to this famous file. Easy, just need to add one simple line. ‘define(‘AUTOSAVE_INTERVAL’, 300); // seconds‘
the 300 being the time that I wanted WordPress to use, 300 seconds = 5 minutes. The ‘//seconds’ is just a commentaire, you don’t have to add it if you don’t want to.
Setting up FileZilla FTP
I knew that I needed a FTP program to connect to my hosted WP to see , obtain and modify this file. In my case my WordPress.org is hosted by Gandi.
As said above. What I couldn’t find anywhere on the web was the exact path to it. Everyone tells you how to modify it but nowhere could I find where it was exactly, as its hidden away under many folders.
FTP I used to use years ago in my own company, using FileZilla. So even though it was a long time ago. So I installed FileZilla on my Arch Linux setup. It runs on Windows or Linux, nice. (Any FTP will do, just here I’ll explain about FileZilla, as I knew it and it works just fine)
So FileZilla downloaded. https://filezilla-project.org/ Now need to access my blog :
Set up your access
Firstly you need to create an’New Site’ under File / Site manager. Then fill in your details need to connect to it.
You will need your ‘access code‘, ‘user‘ and ‘password‘. In my case given to me by Gandi my host provider.
Site Manger: under General, Change the protocol to SFTP -SSH……
Host: add your host access details/code
Port: set it to 22
Logon type: set to Ask for Password
User: add your access details/code
Password: This will asked when you click on the connect button a little lower on the page.
If all goes well you will connect to the root directory of your blog, and on the right hand site, under Remote site: you will see.
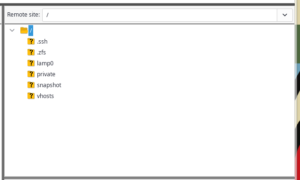
Now from here on it’s quite easy, you just need to find the wp_config.php file.
So double click (attention double click on folders, just opens them), so that’s OK. Double click on a file and it will be copied it to your Local Site on the left hand side in FileZilla, which you don’t want that yet so be careful.
Double click to open the lamp0 folder
Then vhosts
Then the name of your site www.xxxx.com
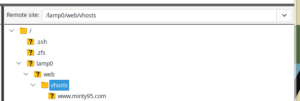
Than htdocs
Once you have double clicked on the htdocs, in the Filezilla right hand window underneath you will see all the files in it, and there will be the famous wp-config.php
/lamp0/web/vhosts/www.yoursitename.com/htdocs
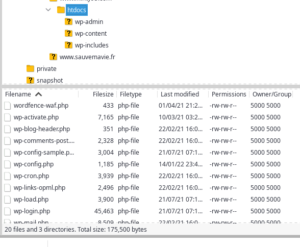
Now what to do with this file and how to modify it ?
FileZilla is basically split into four screens, Left hand side Local Site : . Right hand side Remote site : both with top and bottoms screens.
The Local site is your computer. Now I would suggest you use an new and empty folder for the Local site. Just create in your Documents / Home folder an empty folder. Mine is called File Zila Downloads. In the Local site: menu bar there is an arrow that you can use to guide you to this folder
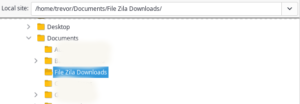
Although you can copy any Remote file to anywhere on your computer. Having an empty folder to copy into, you will see if you copy any files by mistake from the remote site to your local site.
As I said earlier. Double click on a remote folder opens it. Double click on a file will copy it to your PC.
So now that on the right hand bottom window, you have your wp-config.php file amongst others files, and your left bottom window you have the folder you previously created on your computer, in my case ‘File Zila Downloads’. You can double click on the wp-config.php file and it will be copied into this folder.

Now to modify the file at last
Forget Filezilla for a moment and open the folder on your computer where you just copied this file (see above)
Before you do anything. Make a copy of this file and rename it. Original_wp-config.php in my case. That way if you screw up you still have an original copy.
Now you need to open the wp-config.php file and add a simple line in it.
Use ONLY a text editor. Under Windows, Notepad++, Ultraedit, Notepad etc. Do NOT use Word or Openoffice. In linux, Vim, Featherpad for instance.
Open the file and add the following line.
define(‘AUTOSAVE_INTERVAL’, 300); // seconds
I added it up at the top of the page, but it can anywhere in the ‘define section’ One line define(xxx ); per line, don’t string them together.
Exactly as above except you can change the number of seconds to what you want. 300 is five minutes. That’s perfect for me. The ‘// seconds ‘is just a commentaire. You don’t need to add if it you do want to
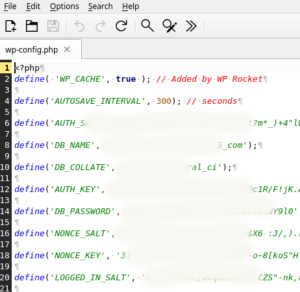
Now save the file, make sure you haven’t changed anything else.
Go back to Filezilla
Back in Filezilla. Now this time we are going to send the modified file back to WordPress on the Remote site: (Left to Right)
To do this you just need to double click the recently modified file on the bottom left hand window which will be sent to the bottom right hand window (You still have the wp-confif.php showing in it ?, don’t you) If you can’t see the modified file bottom left, just refresh the Local site: window, (right click , refresh)

So double clicking on the left hand file will then transfer it back to the right hand window
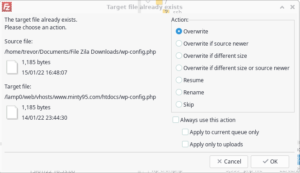
Doing this FileZilla will generate a window asking if you want to overwrite the original file Target file:) by the Source file:. It’s easy to understand. If all Okay, Just click on Okay.
It’s finished
Change the Autosave Interval in WordPress. All is done. So now when in WordPress your autosave will now only save every 300 seconds rather than the 60 seconds standard.